Have you ever wanted to send an automatic email when someone joins your list? MailChimp does have welcome emails, but sometimes you might want to do it through an automated process using triggers. Welcome emails are known for having incredibly good open rates so in this article we're going to walk you through creating a welcome email using MailChimp's Automation feature.
#1 Login and Select Automation
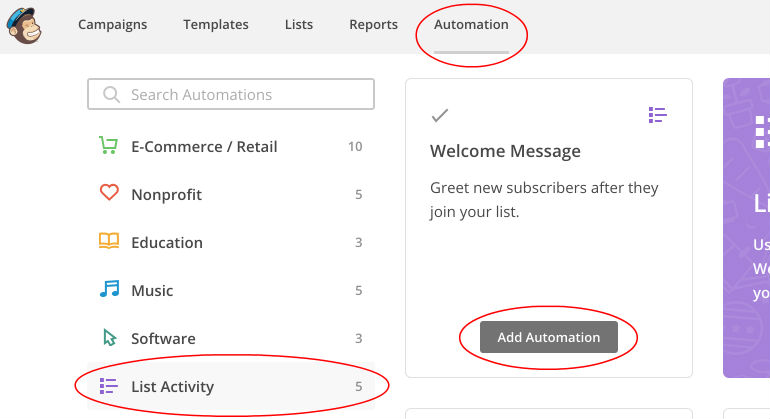
Login or sign up for a MailChimp account and click on the "Automation" tab in the top navigation. Follow this step by clicking on the dark grey "Add Automation" button at the top right. You'll have to scroll down on the left a bit to select the "List Activity" option and then finally click on the Add Automation for the Welcome Message option. These steps may be seen below in the screenshot:
 #2 Name your Automation and Add to a List
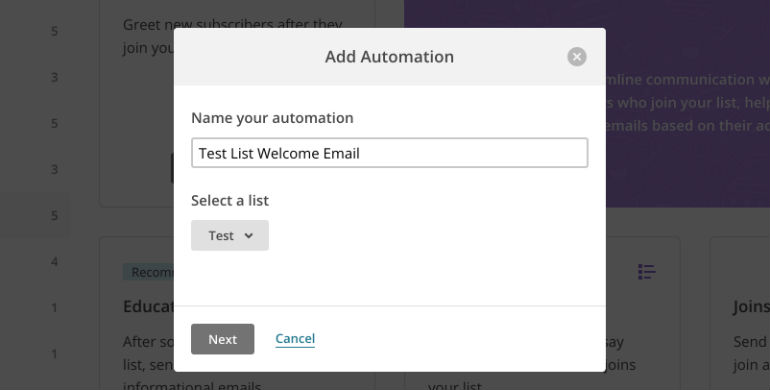
Once you've clicked on the "Add Automation" button, it's time to give your automation a name. It's a good idea to give it a name that you'll remember because as you advance, you'll start to incorporate many automations and losing track of which one does what can lead to a lot of problems. When you create an automation, it needs to be linked to a List. A List in Mailchimp is the name given to a group of email addresses, so what you're doing here is adding the automated email to a list, this list is the one that when a subscriber joins, they'll receive the automated welcome email.
#2 Name your Automation and Add to a List
Once you've clicked on the "Add Automation" button, it's time to give your automation a name. It's a good idea to give it a name that you'll remember because as you advance, you'll start to incorporate many automations and losing track of which one does what can lead to a lot of problems. When you create an automation, it needs to be linked to a List. A List in Mailchimp is the name given to a group of email addresses, so what you're doing here is adding the automated email to a list, this list is the one that when a subscriber joins, they'll receive the automated welcome email.
 #3 Setup the Welcome Email Defaults
On the next screen, you'll need to look for the grey button that says "Design Email", locate it and give it a click. At this point you'll be presented with a form like the one in the screenshot below. There are four things that you'll need to include:
#3 Setup the Welcome Email Defaults
On the next screen, you'll need to look for the grey button that says "Design Email", locate it and give it a click. At this point you'll be presented with a form like the one in the screenshot below. There are four things that you'll need to include:
 #4 Select a Template for the Welcome Email
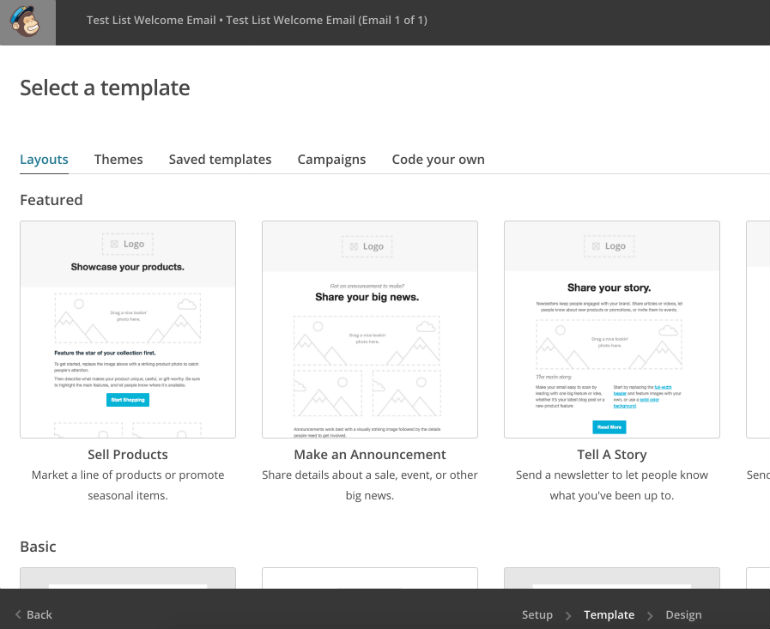
MailChimp has a number of templates that you may pick from. These templates include layouts and themes, but you can also design your own one, or use one you've already created for something else. Because of MailChimp's fantastic editor, you don't need to worry about this too much, but life's made easier when you select a layout that will suit what you want to include in the welcome emailer.
#4 Select a Template for the Welcome Email
MailChimp has a number of templates that you may pick from. These templates include layouts and themes, but you can also design your own one, or use one you've already created for something else. Because of MailChimp's fantastic editor, you don't need to worry about this too much, but life's made easier when you select a layout that will suit what you want to include in the welcome emailer.
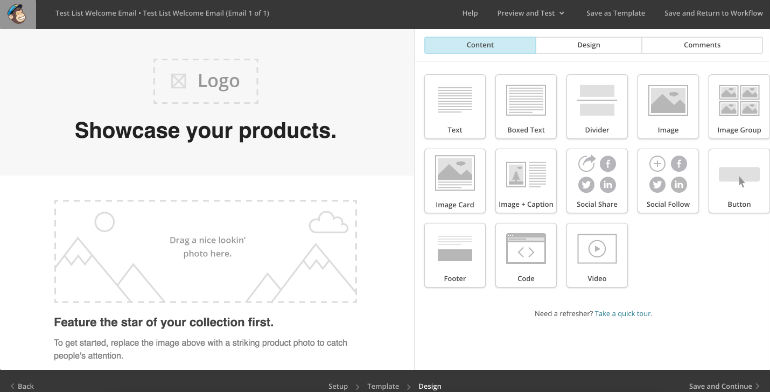
 #5 Design your Welcome Email Template
Once your template is selected, it's time to use MailChimp's Email Editor. The Editor is rather simple to use, but if you're struggling or want to learn something that isn't obvious, MailChimp have a fantastic Knowledge Base that is jam-packed with useful resources to teach you. In essence, you simply click on the elements on the left and then edit them accordingly on the right. Furthermore, you can drag and drop elements from the right to the left to include them in the email.
Once you've designed your email, click on the "Save and Continue" link at the bottom right of your screen.
#5 Design your Welcome Email Template
Once your template is selected, it's time to use MailChimp's Email Editor. The Editor is rather simple to use, but if you're struggling or want to learn something that isn't obvious, MailChimp have a fantastic Knowledge Base that is jam-packed with useful resources to teach you. In essence, you simply click on the elements on the left and then edit them accordingly on the right. Furthermore, you can drag and drop elements from the right to the left to include them in the email.
Once you've designed your email, click on the "Save and Continue" link at the bottom right of your screen.
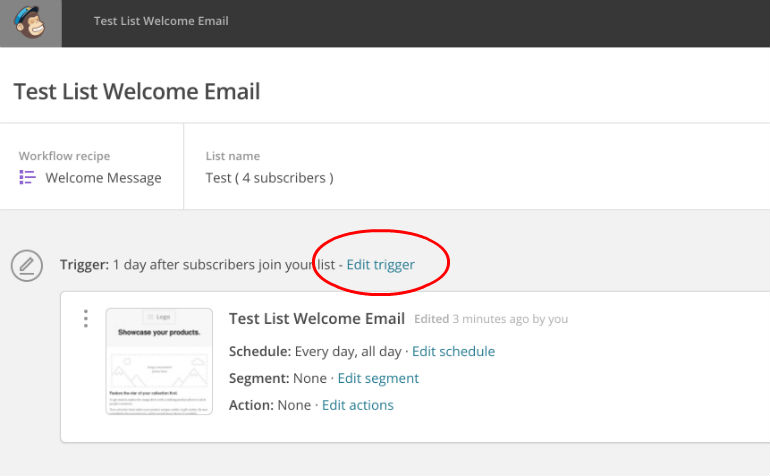
 #6 Edit the Trigger
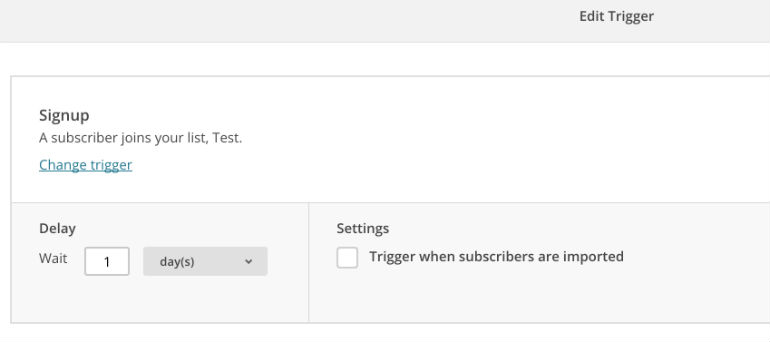
The next step is incredibly important. You'll be looking at the screen below and you want to click on "Edit trigger". Editing the trigger is where you set up how quickly the Welcome Email will send and whether a person should receive it when they subscribe. The first screenshot below shows where you click "Edit trigger" and the second screenshot shows the options.
If you want the email to go out immediately to someone when they subscribe, make sure that you click the dropdown menu and choose "immediately", this will ensure that the email you create above will automatically send to someone who subscribes. There are several options here, just use the one that fits the approach you want to take with a new subscriber. Click the grey "Update Trigger" button at the top right when you are done.
#6 Edit the Trigger
The next step is incredibly important. You'll be looking at the screen below and you want to click on "Edit trigger". Editing the trigger is where you set up how quickly the Welcome Email will send and whether a person should receive it when they subscribe. The first screenshot below shows where you click "Edit trigger" and the second screenshot shows the options.
If you want the email to go out immediately to someone when they subscribe, make sure that you click the dropdown menu and choose "immediately", this will ensure that the email you create above will automatically send to someone who subscribes. There are several options here, just use the one that fits the approach you want to take with a new subscriber. Click the grey "Update Trigger" button at the top right when you are done.
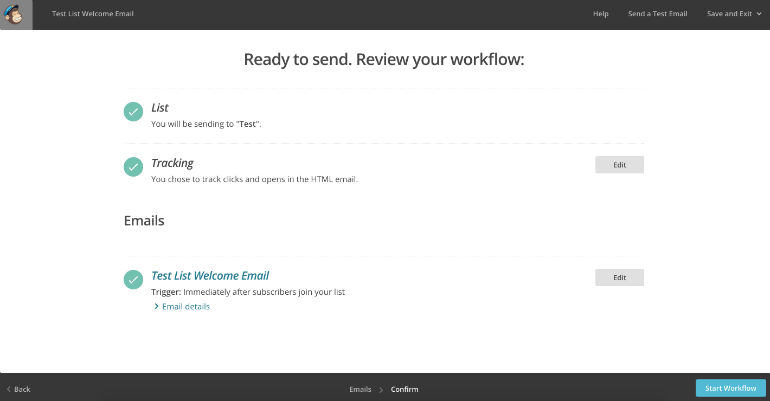
 # 7 Start Workflow
Once you've finished configuring the trigger settings, you may click the "Start Workflow" button at the bottom right of the screen. At this point you're done and every time someone joins your list, they'll receive your Welcome Email.
# 7 Start Workflow
Once you've finished configuring the trigger settings, you may click the "Start Workflow" button at the bottom right of the screen. At this point you're done and every time someone joins your list, they'll receive your Welcome Email.
 One of the best things about this is that you can set it up and use it with a free account on MailChimp. However, if you start to receive a large number of subscribers, you will need to upgrade your package accordingly. It's a wise idea to keep an email on how many subscribers there are so as to afford you the time to upgrade when necessary.
This automatic welcome email approach in MailChimp can honestly make or break your campaign. Most of the top services around the internet have welcome emails where they introduce you to features of a product or let you know how to get in touch if you have any questions. It's the perfect way to get a new subscriber interested in your business or product.
Let us know if you've received any great results or if you need a hand with anything. Comments below are open!
One of the best things about this is that you can set it up and use it with a free account on MailChimp. However, if you start to receive a large number of subscribers, you will need to upgrade your package accordingly. It's a wise idea to keep an email on how many subscribers there are so as to afford you the time to upgrade when necessary.
This automatic welcome email approach in MailChimp can honestly make or break your campaign. Most of the top services around the internet have welcome emails where they introduce you to features of a product or let you know how to get in touch if you have any questions. It's the perfect way to get a new subscriber interested in your business or product.
Let us know if you've received any great results or if you need a hand with anything. Comments below are open!
#2 Name your Automation and Add to a List
Once you've clicked on the "Add Automation" button, it's time to give your automation a name. It's a good idea to give it a name that you'll remember because as you advance, you'll start to incorporate many automations and losing track of which one does what can lead to a lot of problems. When you create an automation, it needs to be linked to a List. A List in Mailchimp is the name given to a group of email addresses, so what you're doing here is adding the automated email to a list, this list is the one that when a subscriber joins, they'll receive the automated welcome email.
#3 Setup the Welcome Email Defaults
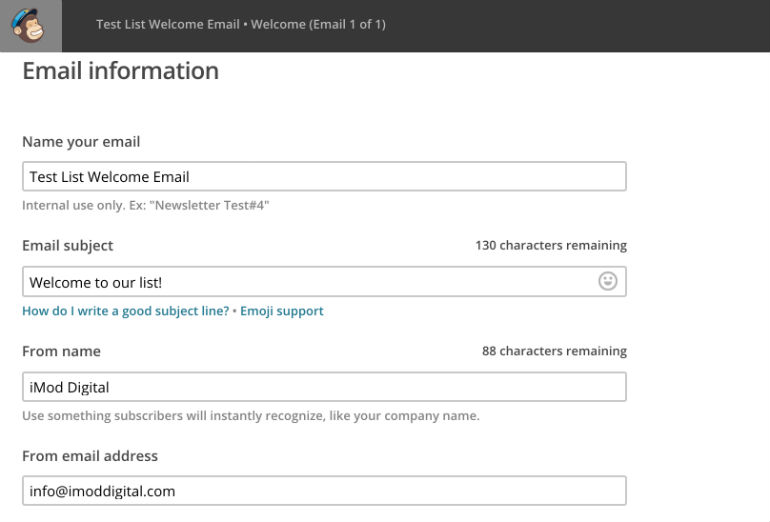
On the next screen, you'll need to look for the grey button that says "Design Email", locate it and give it a click. At this point you'll be presented with a form like the one in the screenshot below. There are four things that you'll need to include:
- A name for your welcome email, this won't be seen by anyone but yourself.
- A subject line for the email, take the time to come up with a subject that the person who just signed up will recognise that it's from you. This is a fantastic way to ensure that the email is opened.
- The third field is the From name, this is what will appear in the From field in the email program, once again try to use something the subscriber will recognise (and trust).
- Finally, enter in the email address that the person will receive the email from. You'll need to decide whether you want an address that people can write back to or not.
#4 Select a Template for the Welcome Email
MailChimp has a number of templates that you may pick from. These templates include layouts and themes, but you can also design your own one, or use one you've already created for something else. Because of MailChimp's fantastic editor, you don't need to worry about this too much, but life's made easier when you select a layout that will suit what you want to include in the welcome emailer.
#5 Design your Welcome Email Template
Once your template is selected, it's time to use MailChimp's Email Editor. The Editor is rather simple to use, but if you're struggling or want to learn something that isn't obvious, MailChimp have a fantastic Knowledge Base that is jam-packed with useful resources to teach you. In essence, you simply click on the elements on the left and then edit them accordingly on the right. Furthermore, you can drag and drop elements from the right to the left to include them in the email.
Once you've designed your email, click on the "Save and Continue" link at the bottom right of your screen.
#6 Edit the Trigger
The next step is incredibly important. You'll be looking at the screen below and you want to click on "Edit trigger". Editing the trigger is where you set up how quickly the Welcome Email will send and whether a person should receive it when they subscribe. The first screenshot below shows where you click "Edit trigger" and the second screenshot shows the options.
If you want the email to go out immediately to someone when they subscribe, make sure that you click the dropdown menu and choose "immediately", this will ensure that the email you create above will automatically send to someone who subscribes. There are several options here, just use the one that fits the approach you want to take with a new subscriber. Click the grey "Update Trigger" button at the top right when you are done.
# 7 Start Workflow
Once you've finished configuring the trigger settings, you may click the "Start Workflow" button at the bottom right of the screen. At this point you're done and every time someone joins your list, they'll receive your Welcome Email.
One of the best things about this is that you can set it up and use it with a free account on MailChimp. However, if you start to receive a large number of subscribers, you will need to upgrade your package accordingly. It's a wise idea to keep an email on how many subscribers there are so as to afford you the time to upgrade when necessary.
This automatic welcome email approach in MailChimp can honestly make or break your campaign. Most of the top services around the internet have welcome emails where they introduce you to features of a product or let you know how to get in touch if you have any questions. It's the perfect way to get a new subscriber interested in your business or product.
Let us know if you've received any great results or if you need a hand with anything. Comments below are open!